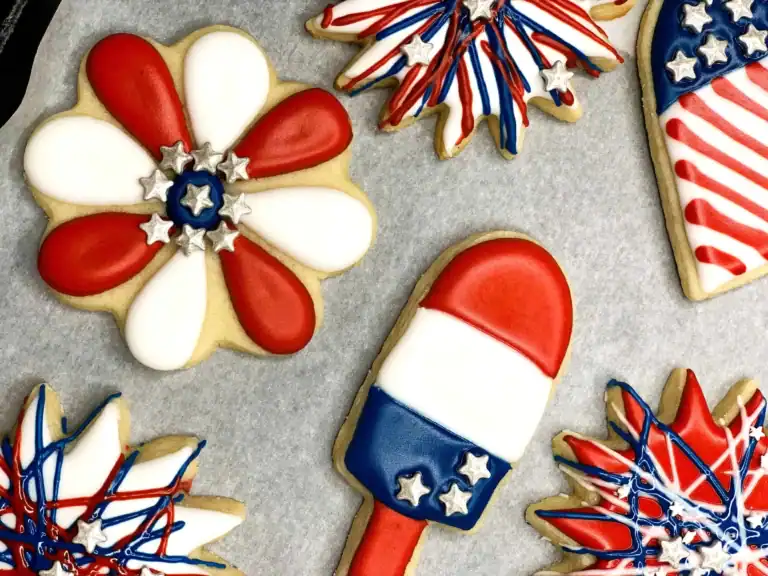
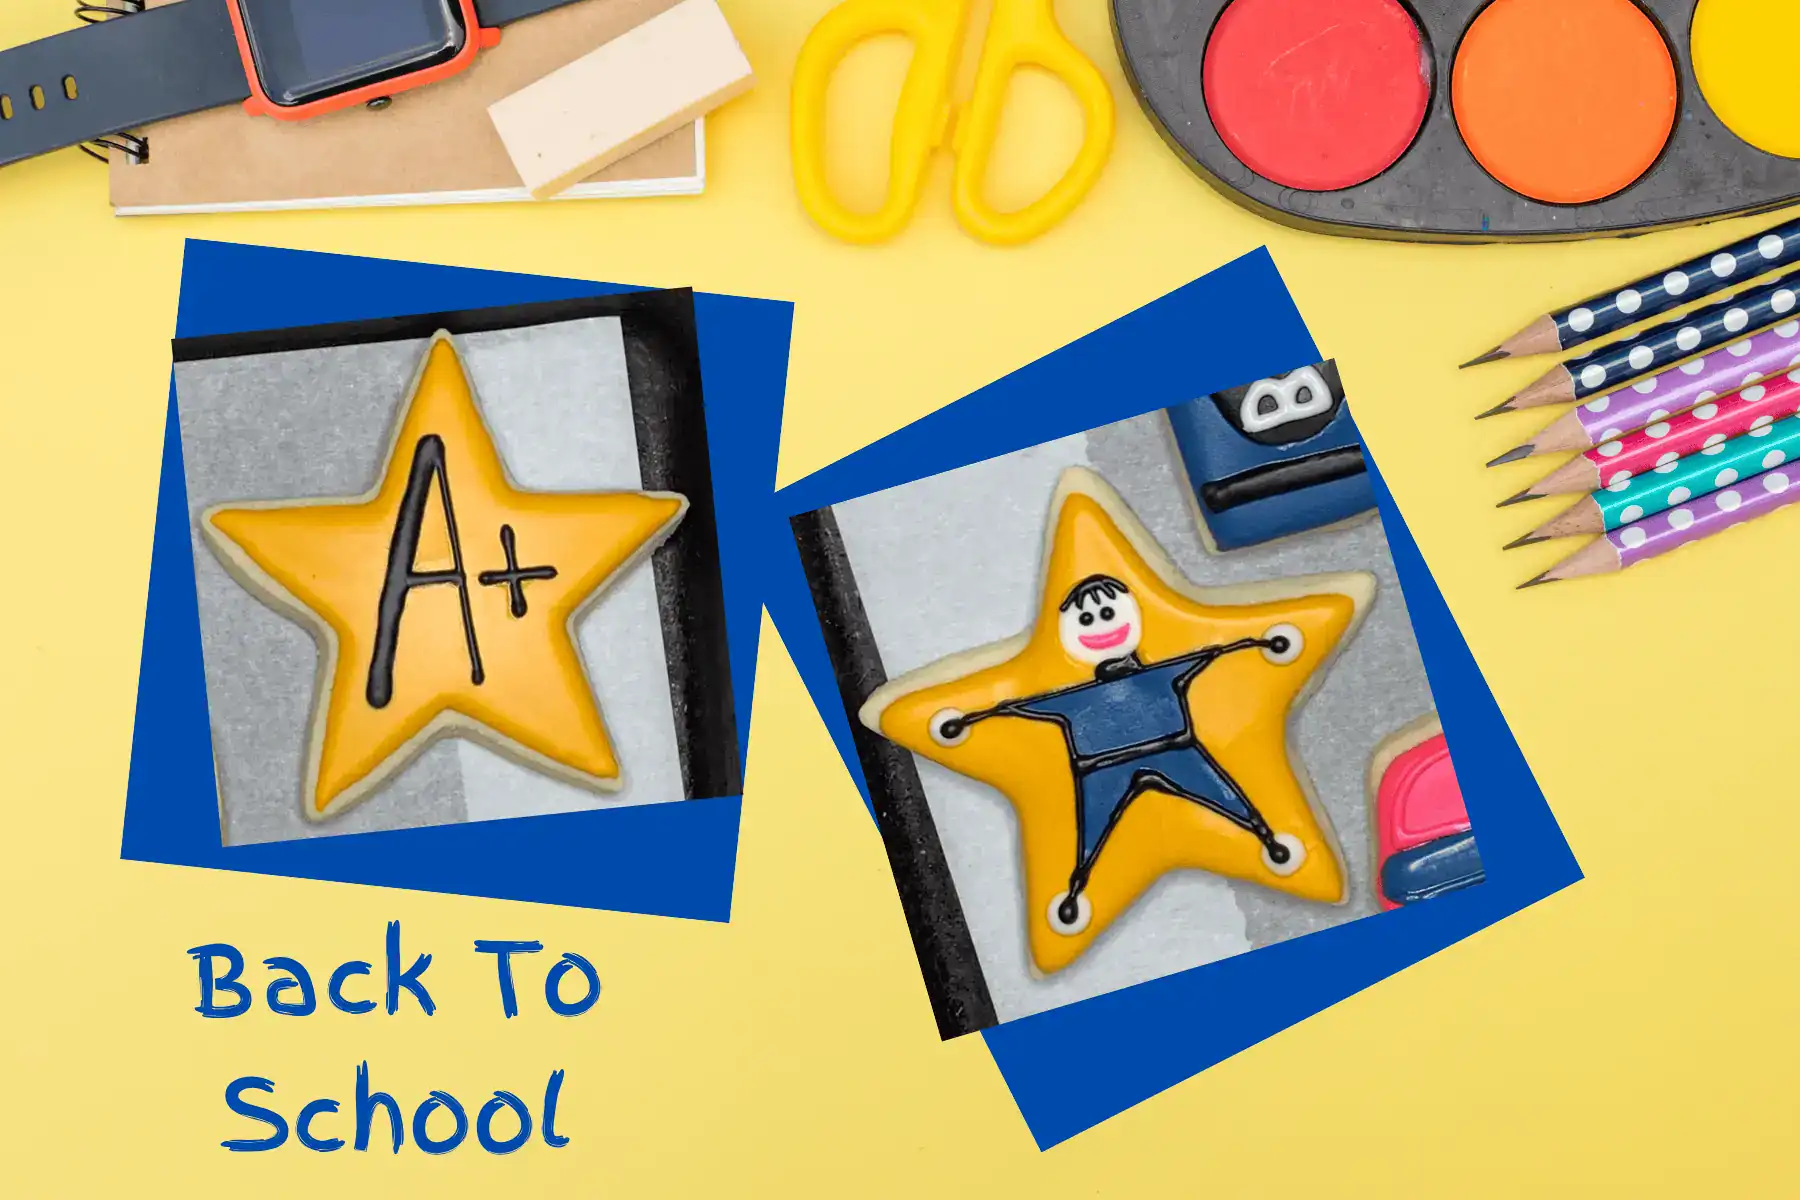
Star Sugar Cookies – Back-to-School Treats
⭐Star Cookies That Shine Bright
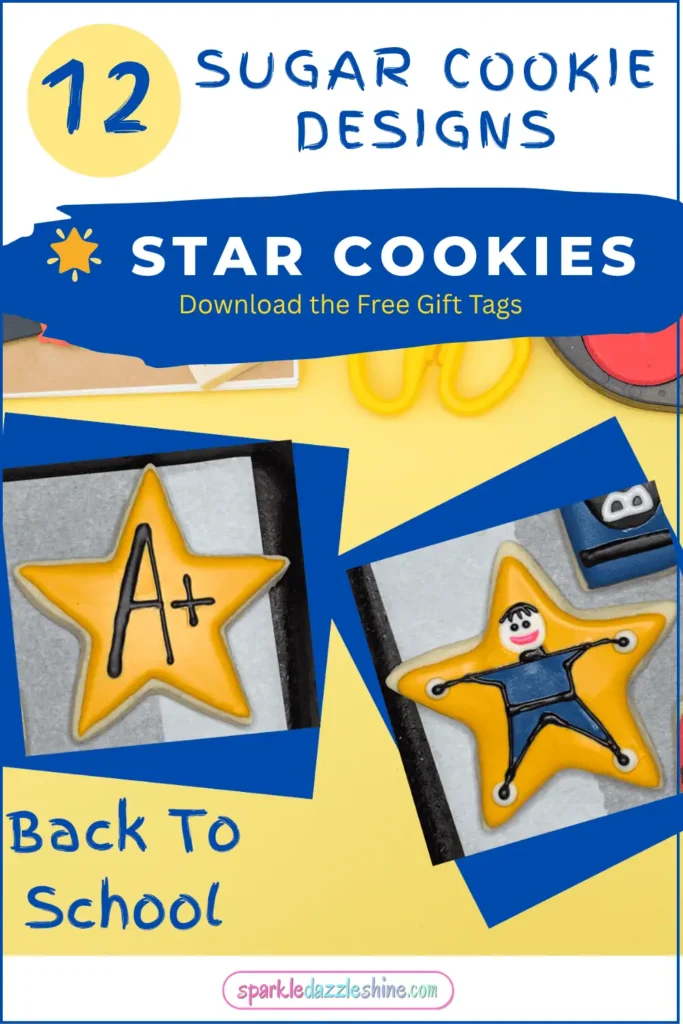
Star Sugar Cookies – Back-to-School Treats that are sure to delight. Every student deserves a gold star—and now, they can have one that’s sweet, buttery, and made with love! These Star Sugar Cookies are the final cookie in my Back-to-School Cookie Decorating Series, and they’re full of charm and encouragement.
We’re ending on a high note with two versions:
- A beginner-friendly cookie that proudly says A+
- A fun, intermediate “Star Boy” design made entirely from simple shapes!
Let’s get decorating—and finish this set like the stars we are. 💫
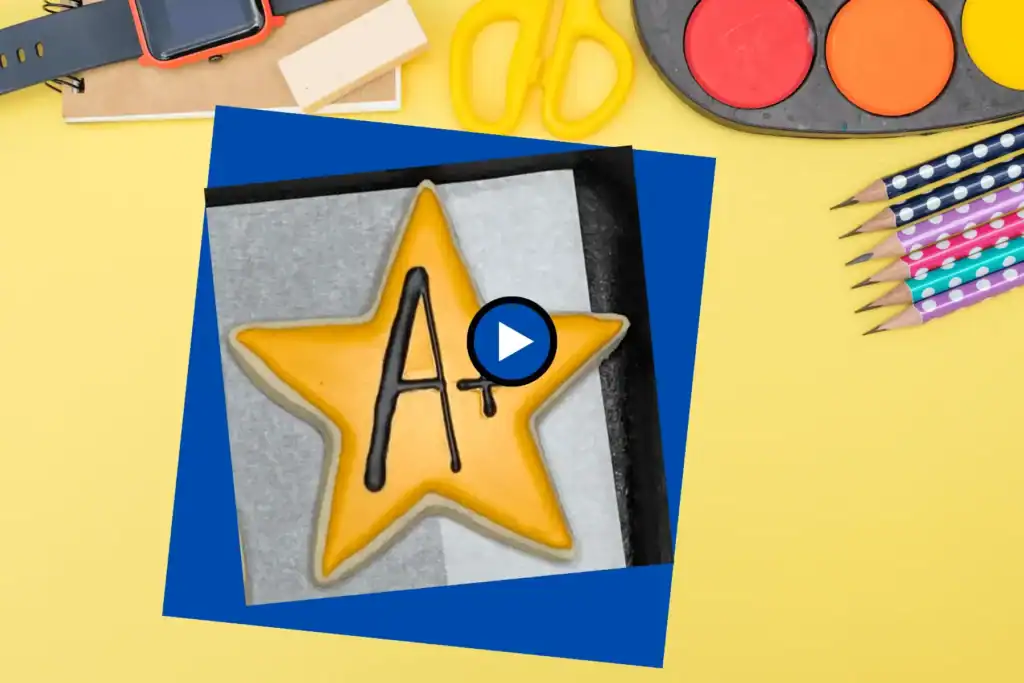
⭐ Cookie #1: A+ Gold Star (Beginner-Friendly)
This sweet little star is super simple and so, so cute. It’s the kind of cookie that shouts, “Great job!”—without needing a lot of time or materials. Great for beginners or quick batches!

🛠️ What You’ll Need:
- Star-shaped cookie cutter
- Baked & cooled sugar cookies
- Royal icing in:
- Yellow (outline + flood)
- Black (outline only)
- Piping bags + tips #1 and #3
📝 Step-by-Step Instructions:
- Outline the Star:
Use yellow outline icing and a #1 tip to trace the shape of the star cookie. - Flood the Cookie:
Fill the star with yellow flood icing. Be sure to scribble a little icing in the center first and then fill from the outside in—this helps avoid dips and sunken centers. - Let It Dry:
Set aside for at least 1 hour, or longer if you plan to stack or decorate further. - Add the A+:
Once dry, use black outline icing and a #1 tip to pipe a simple block-style “A” and a plus sign to its right.
🎉 That’s it! A simple cookie with big charm—perfect for teachers, students, or anyone earning a gold star.
Unlock Your 51 Page “Free” Sugar Cookie & Royal Icing Toolkit Today!

The Beautiful, printable Sugar Cookie & Royal Icing recipe cards are included inside your FREE Toolkit — Grab it for the prettiest version to save, print, or add to you binder 🍬✨
Say Goodbye to baking stress and Hello to Cookie Perfection. You’ll receive your comprehensive toolkit filled with recipes and guides to transform your Cooking-Making Experience
Your Toolkit is just a click away!
🎥 Watch the A+ Star Cookie video tutorial here:
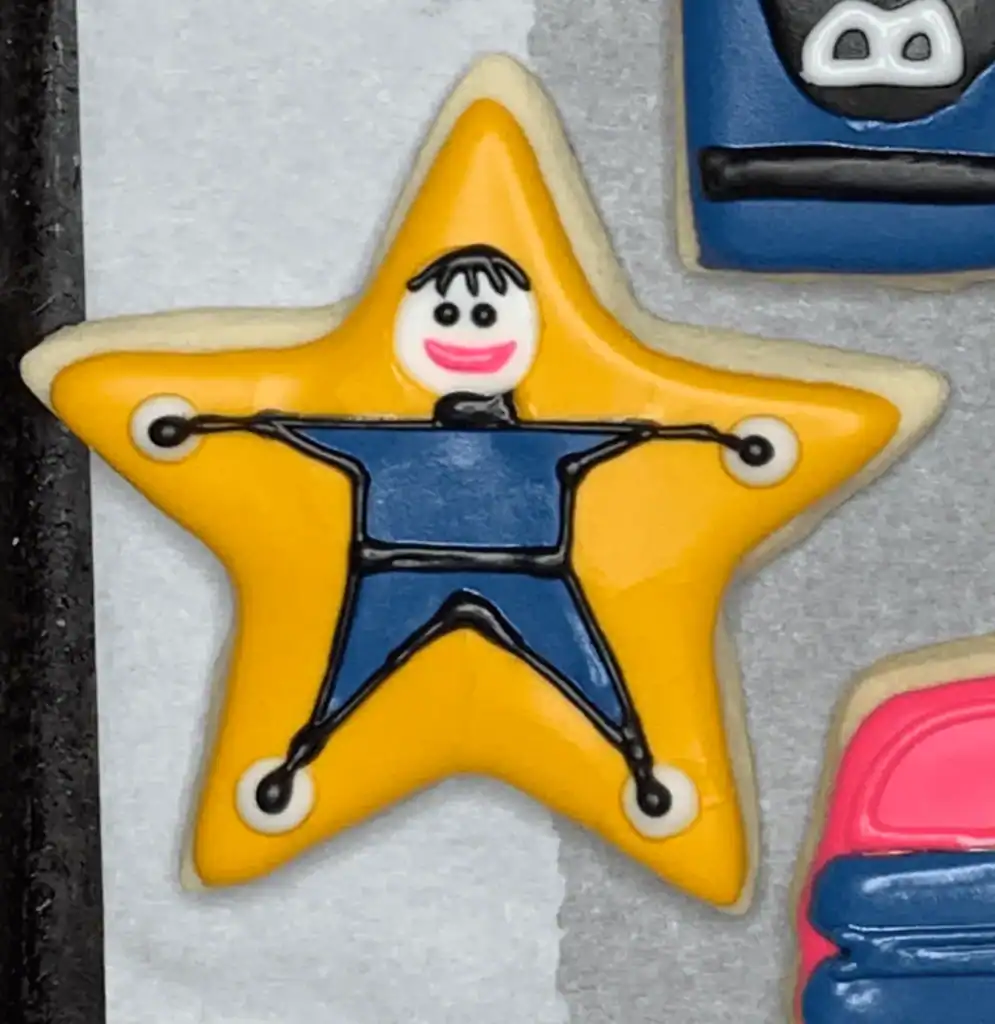
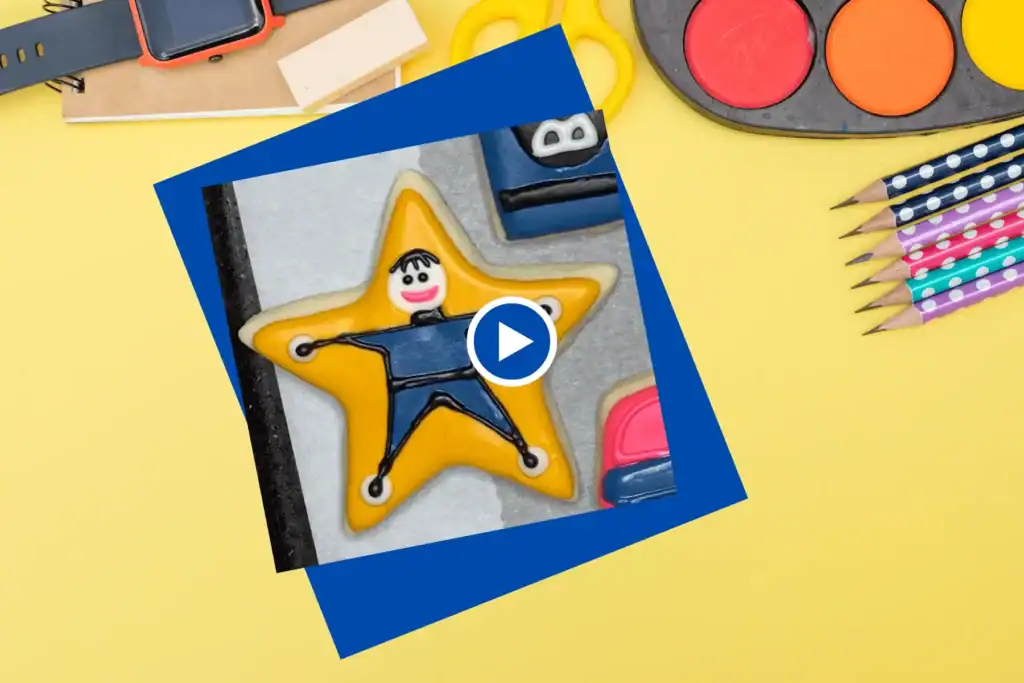
🌟 Cookie #2: Star Boy Cookie (Intermediate)
This cookie takes a bit more time but is SO worth it. We’re turning a star into a superhero-style character using nothing but simple shapes and a little imagination. Trust me—it’s easier than it sounds, and the final result is totally magical.
🎨 What You’ll Need:
- Star-shaped cookie cutter
- Baked and cooled sugar cookie
- Royal icing in:
- Yellow (outline + flood for star)
- White (head, hands, feet)
- Blue or color of choice (body)
- Black (details/outline)
- Piping bags + tips #1 and #3
- Scribe tool or toothpick
📝 Step-by-Step Instructions:
- Flood the Star Base:
Outline and flood the cookie with yellow icing. Don’t forget the scribble technique before flooding.
Carefully transfer the cookie to a drying rack with a thin spatula and let it dry completely (minimum 1 hour).
✏️ Back-to-School & Sweet as Ever
Explore the full roundup of school-themed cookie fun!
👦 Build Your Star Boy (Using Shapes!):
We’ll build the body using:
- Triangles for the arms and legs
- A rectangle for the torso
- Circles for the head, hands, and feet
Here’s how:
✋ Arms:
- Pipe a straight horizontal blue line into the left and right points of the star.
- From each end, pipe diagonal lines that meet below the middle to create upside-down triangles (wide side facing up).
👣 Legs:
- Repeat this method with the bottom two points of the star.
🟦 Body:
- Pipe two vertical blue lines connecting the tops of the legs to the bottom of the arms—creating a rectangle between them.
- Flood the entire body area.
✏️ Feeling unsure? Practice on parchment paper over a sketched star! Let the best one dry, then glue it to a real cookie with a bit of icing. Easy win!

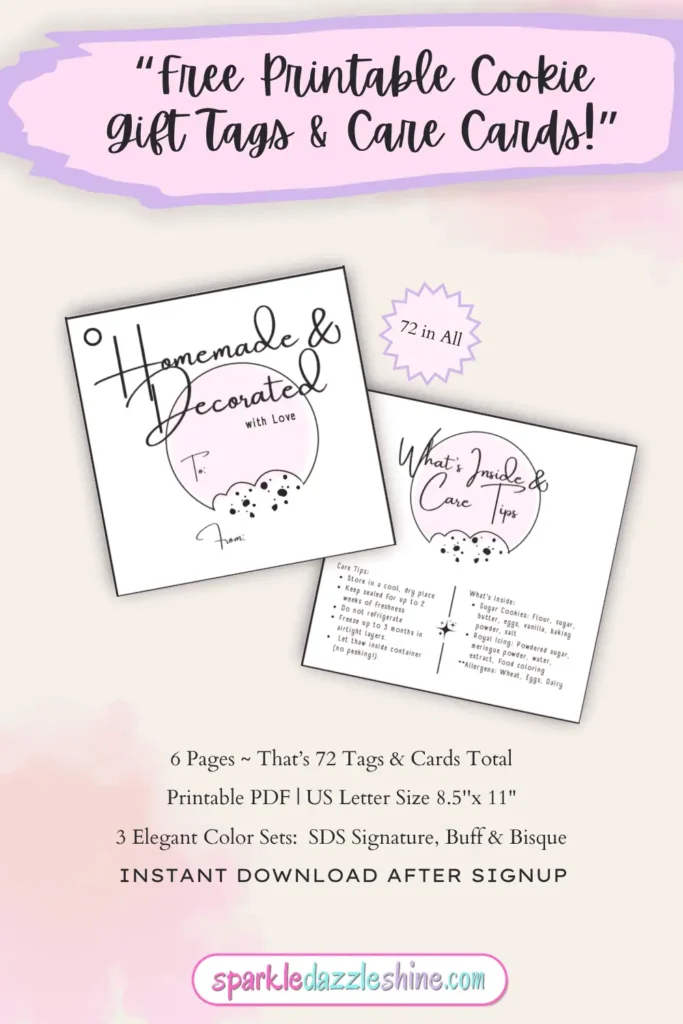
✨ Want to Dress Up Your Cookie Gifts?
Grab this free printable set of cookie tags and care cards in 3 gorgeous colors — perfect for gifting with a personal touch. Just sign up below and they’re yours!
😊 Add Head, Hands, & Feet:
- Pipe a white circle in the top point of the star for the head.
- Add smaller white dots near the end of each arm and leg for the hands and feet.
✍️ Add Details:
- Once the body has set, outline the figure in black icing.
- Extend the black lines to connect the hands and feet to the limbs.
- Pipe a belt and collar with black icing for added style.
- Add small black dots to hands and feet.
🧑🎨 Face Time!
- Pipe a half-circle hairline at the top of the head.
- Add three short bangs using quick downward strokes.
- Pipe two dots for eyes, and a small smile-shaped curve for the mouth.
💡 Don’t overthink the face! It’s meant to be playful and a little cartoony.
🎥 Watch the Star Boy Cookie video tutorial here:
✨ Twinkle as bright as the stars
These star cookies are a bright and cheerful way to wrap up your back-to-school decorating. From a simple A+ to a full-on Star Boy, they remind us that school is about more than books—it’s about celebrating effort, creativity, and every little win.
Pin & Share!!!