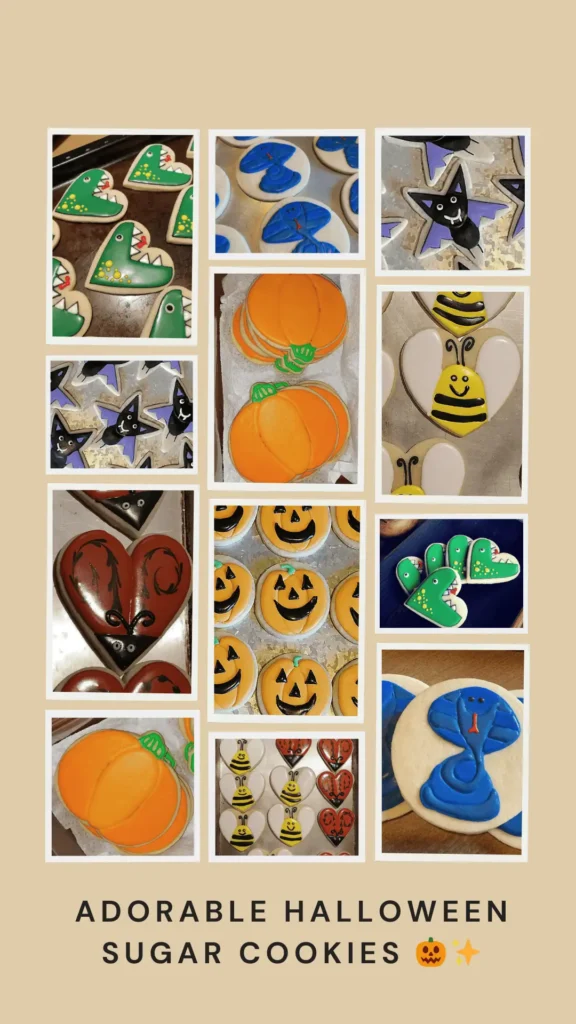
Adorable Halloween Sugar Cookies 🎃✨
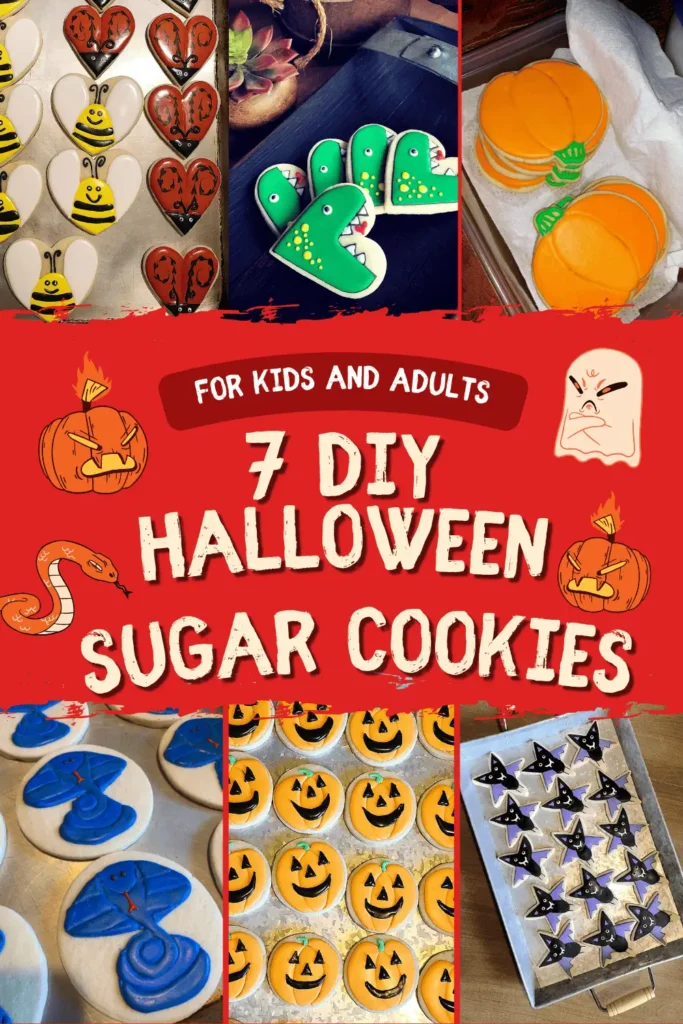
Adorable Halloween Sugar Cookies and No Fancy Cutters Needed! Halloween doesn’t always have to be spooky to be fun. In fact, when it comes to cookies, sometimes the sweetest treat is the one that makes kids giggle instead of squeal. These Halloween sugar cookies are made with preschoolers and kindergarteners in mind — full of color, smiles, and playful designs that are just right for little hands and big imaginations. 🎃👻
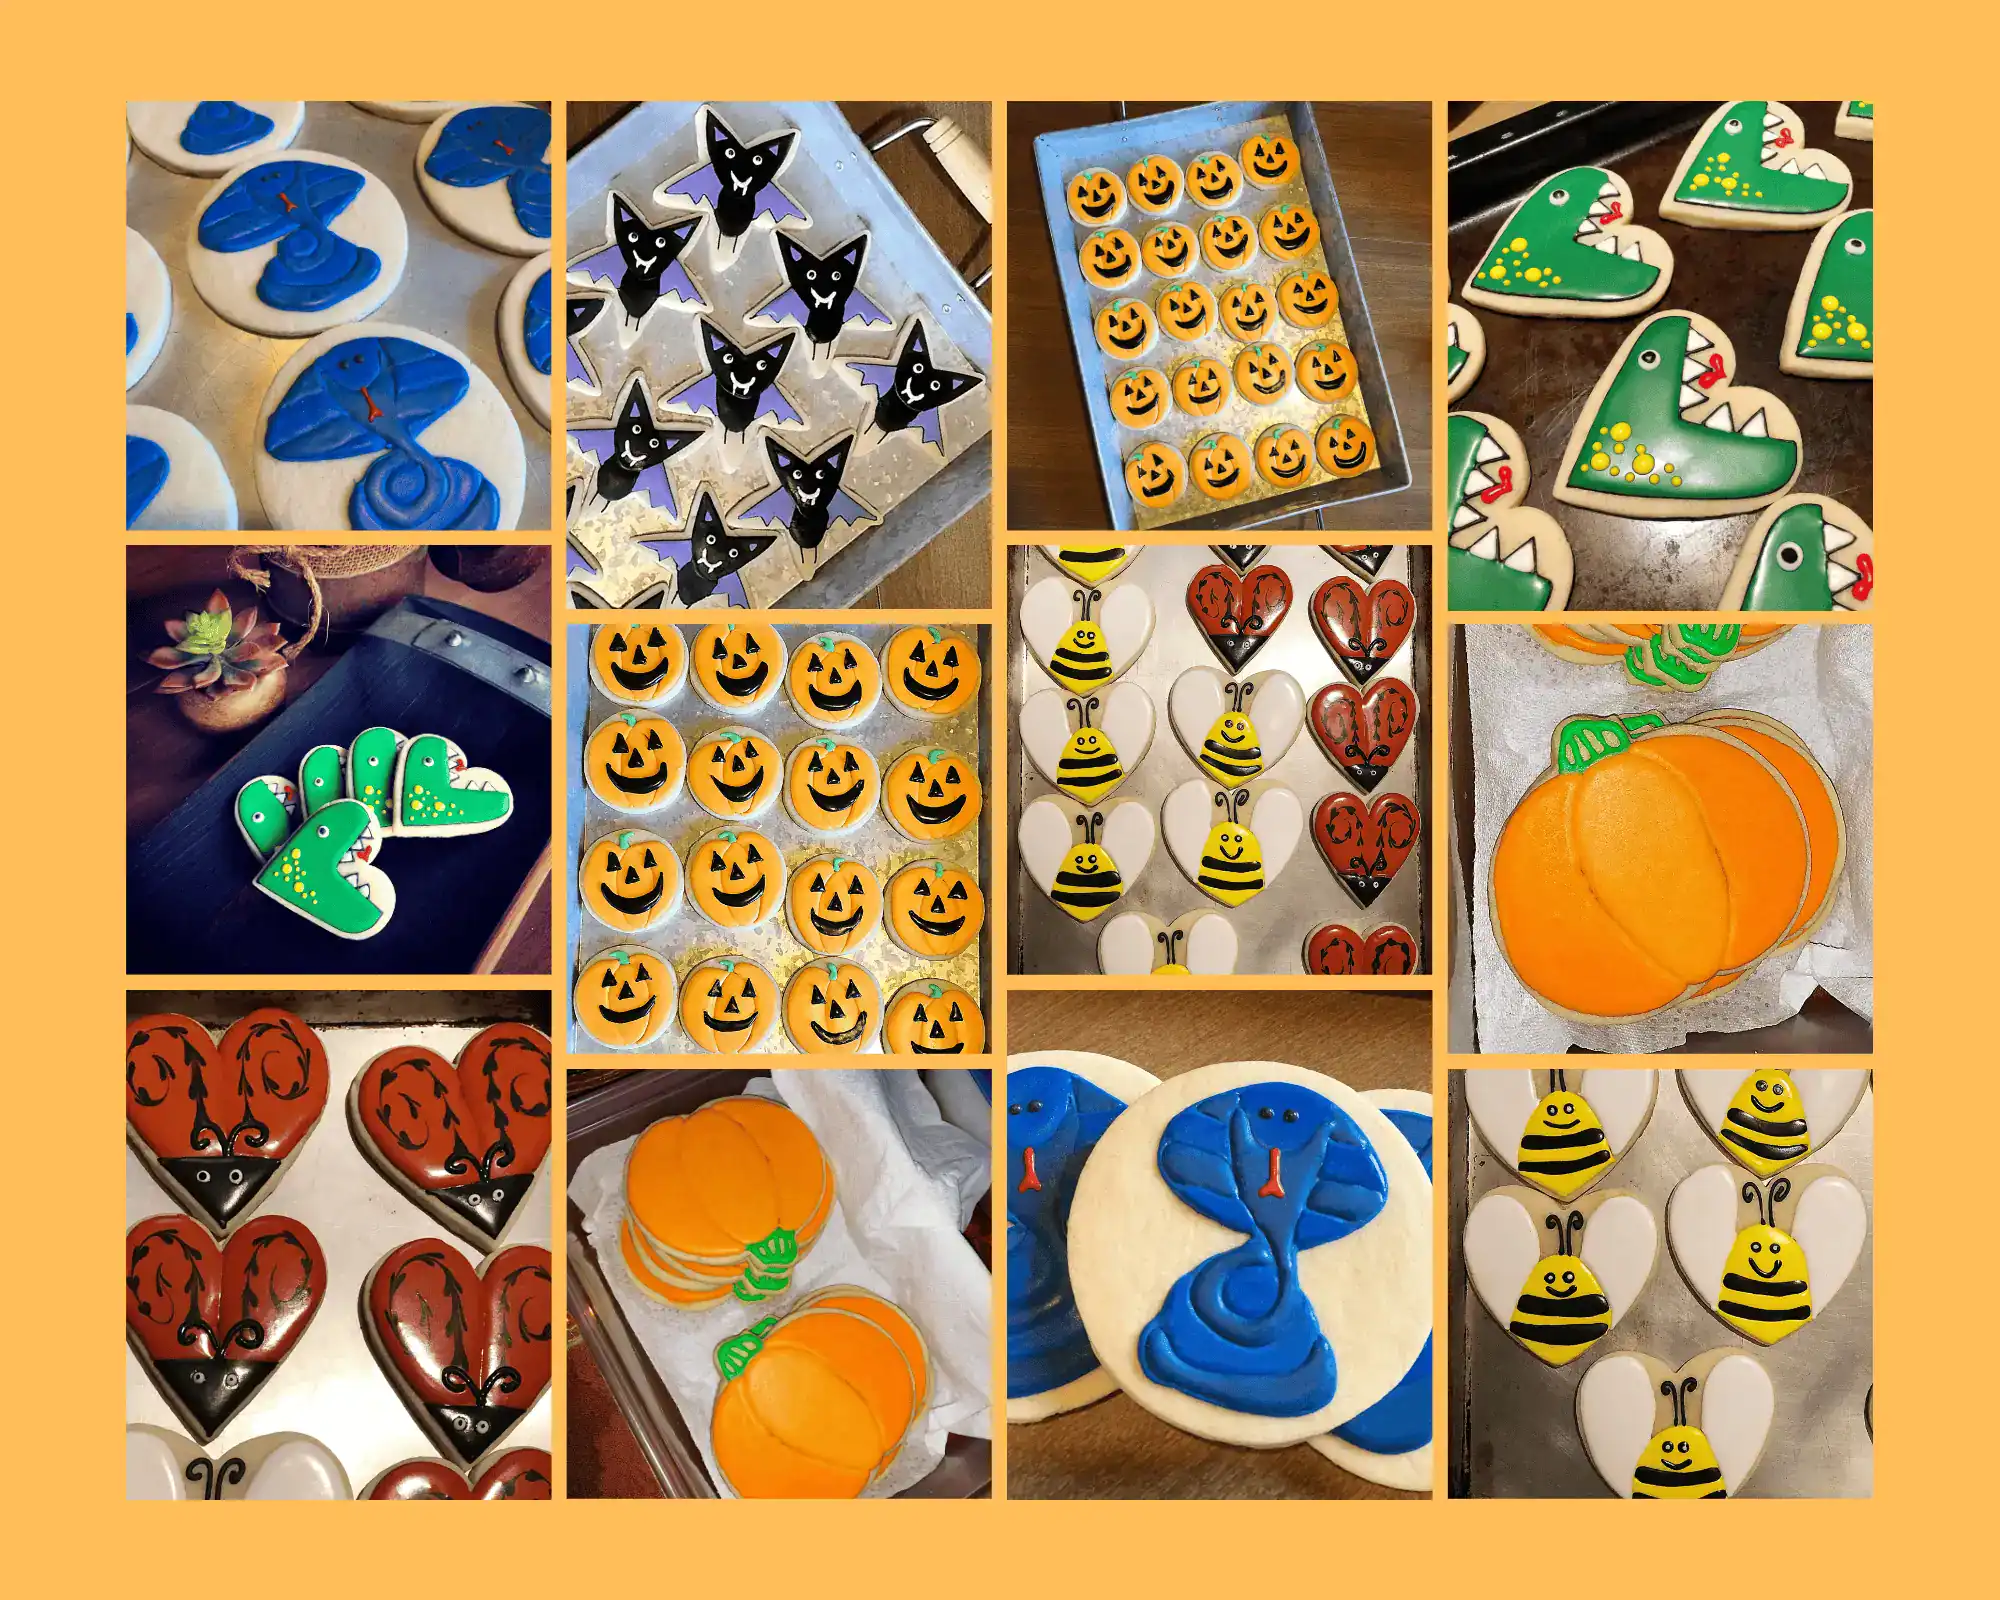
Here’s the magical twist: you don’t need a drawer full of special Halloween cookie cutters. Nope, not one bat, ghost, or pumpkin cutter is required. A simple star turns into a fangy vampire, a round cookie becomes the happiest jack-o-lantern on the block, and a humble heart shape transforms into a dinosaur, a bug, or even a “bee-witching” bumblebee.
With just one sugar cookie recipe, a batch of royal icing, and a sprinkle of creativity, you can whip up a platter of cookies that looks like it came from a bakery — without ever buying new cutters. These designs are proof that Halloween cookie magic comes more from imagination than from tools.
👉 Before you dive in, gather these helpful resources:
- Sugar Cookie How-To — a walkthrough of the baking process.
- Royal Icing How-To — your guide to mixing, coloring, and consistency.
- Free Toolkit Download — includes the complete, printable recipe cards for both sugar cookies and royal icing (measurements + all the sweet details!).
Ready? Let’s turn ordinary shapes into extraordinary Halloween treats that kids and grown-ups will adore. ✨
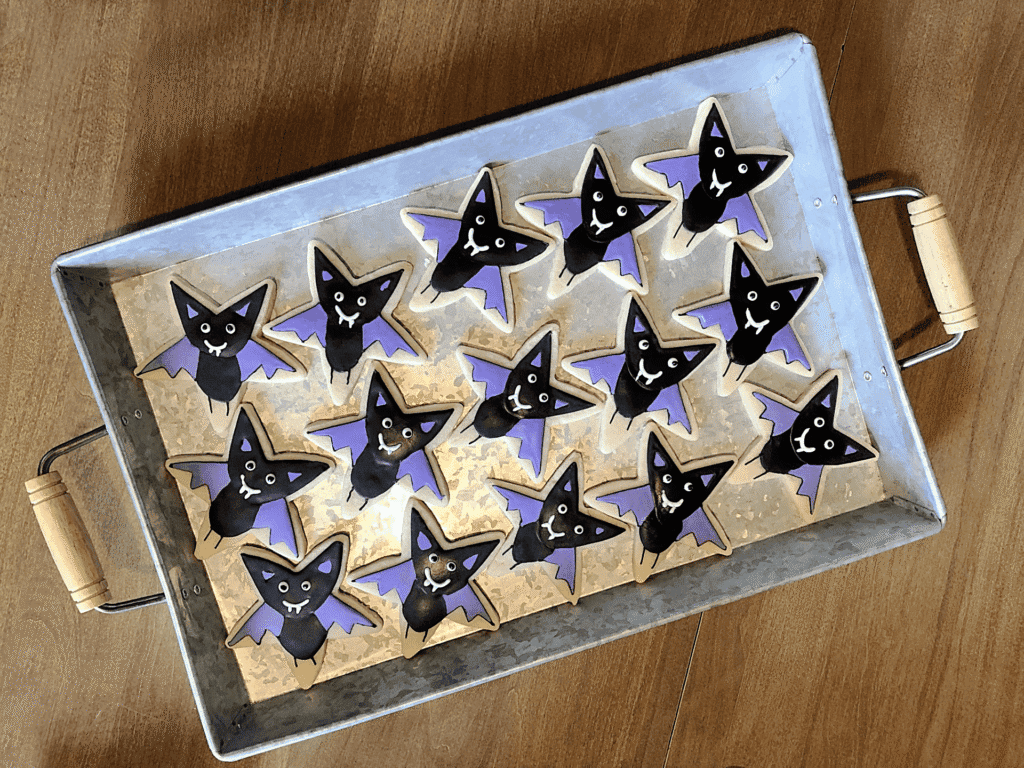
Vampire Star Halloween Cookies 🦇⭐
Who knew a star cookie cutter could double as the perfect Halloween vampire? These little guys (or gals — Vampira if you prefer) are living proof that you don’t need a bat-shaped cutter to pull off a spooky-but-sweet design. They’re intermediate-level cookies, which means they’re not the best choice for tiny decorators to pipe themselves, but they’re absolutely perfect for little hearts to admire, snack on, or help with simpler finishing touches like eyes or smiles.
Step 1: Plan Your Sections
The key to a successful vampire cookie is working in stages. Think of your star shape as a canvas with three main areas: the face, the body, and the wings. Outline and flood the head and body separately so they don’t melt into each other. Give each section a little drying time in between — not hours, just enough to prevent the icing from spilling into the wrong space. (And if a few of your sections do spill together? No stress — it adds character, and trust me, nobody’s going to complain while munching on a cookie.)
Step 2: Friendly Face, Not Frightening
Instead of going with the traditional sharp, pointy chin, round it out to highlight that big vampire grin. Once the icing has set, pipe on the smile and add those tiny triangle fangs. The goal here is “cute cartoon vampire,” not “I’m here to haunt your dreams.” Kids will see a silly face, not something spooky, which makes these cookies a win for the preschool set.
Step 3: Wings with a Twist
Most bat wings go black — but why not shake it up? These wings are outlined in black but filled with purple, giving them a fun pop of color. It also keeps them from blending too much into the dark body. Tip: when flood-filling, stop just short of the black outline so the color contrast stays sharp and the wings keep that playful, cartoonish look.
Step 4: Add the Details
The finishing touches are where this vampire really shines. Small triangle accents on the wings, a pair of wobbly legs piped at the bottom, and those wide eyes. You can use candy eyes if you’ve got them on hand, or pipe your own. Personally, I prefer piping — store-bought eyes can be a little crunchy and distract from the soft bite of the cookie. But hey, if convenience wins, nobody will turn down a cookie because of it.
Step 5: Make It Yours
Want to take it up a notch? Play with eye shapes to give each vampire a unique personality — one goofy, one surprised, one a little cross-eyed. Kids love when their cookies have “faces,” and it makes your tray feel alive with silly characters.
These vampire star cookies aren’t spooky, they’re storybook. Put them on a tray next to pumpkins and bugs, and you’ll have a Halloween platter that feels magical, not monstrous. 🧡
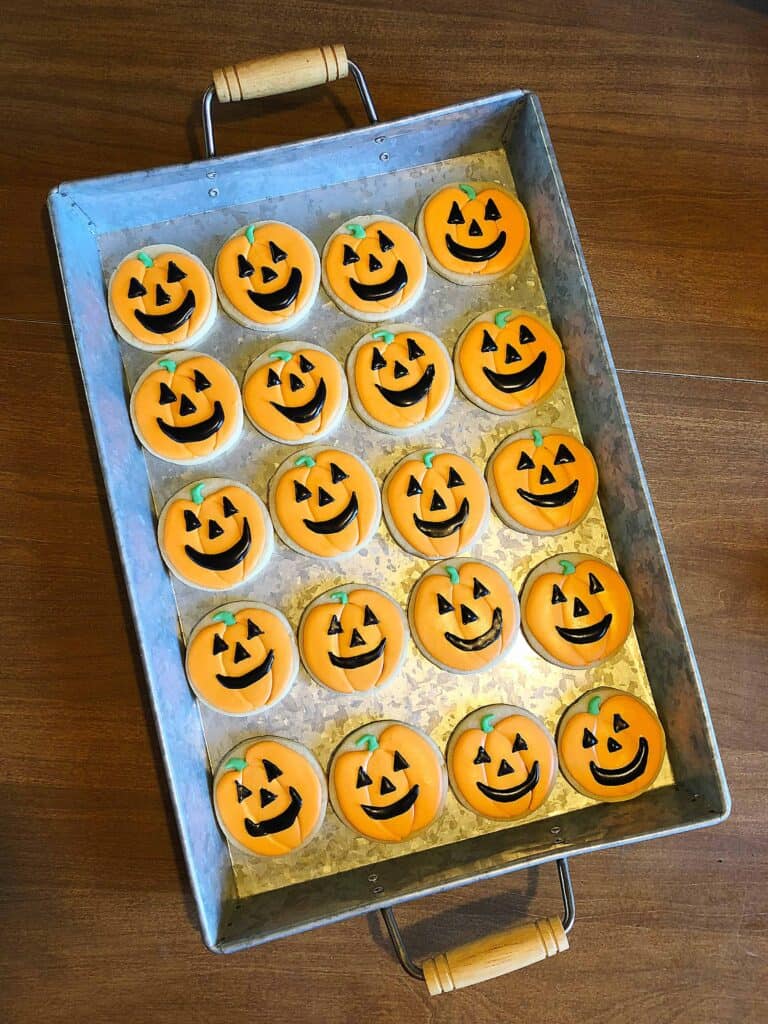
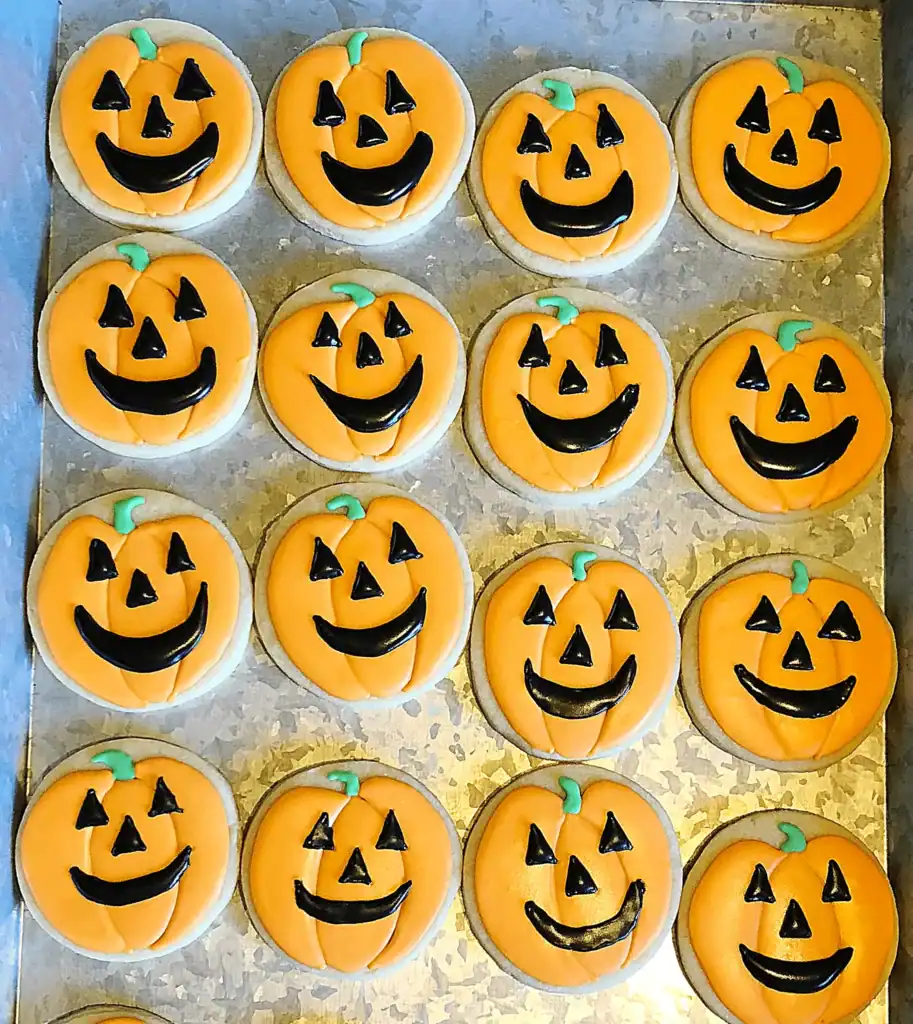
Jack-o-Lantern Halloween Cookies 🎃
Nothing says Halloween quite like a jack-o-lantern, and these happy-faced pumpkin cookies are the cutest addition to your tray. They’re cheerful, bright, and just right for little decorators to join in the fun. Think of these as “starter cookies” — simple shapes, easy colors, and lots of opportunities for giggles and sticky fingers.
Step 1: The Center Pumpkin Oval
Start by outlining and flood-filling the center oval. This is the perfect spot to let the little hearts try their hand at decorating. Instead of piping bags (which can feel intimidating or too big for tiny fingers), use small condiment dispensers filled with flood consistency icing. Hand one over and watch the magic happen — those little hands will feel so proud as they fill in the orange oval all by themselves.
Want to add an educational twist? Let the kids help mix the orange icing. Show them how yellow plus a drop of red makes orange, and watch their faces light up as the colors swirl together. It’s a sweet science experiment with an edible reward at the end!
Step 2: Add the Side Sections
Once the center is dry, outline and flood the two side ovals to complete the pumpkin’s body. To set kids up for success, pipe a thicker outline line for them to fill against. It acts like a bumper guard, keeping their flood icing contained. Even if the icing doesn’t stay perfectly in the lines, the sections will still look like a pumpkin when it all comes together.
👉 Before you dive in, gather these helpful resources:
- Sugar Cookie How-To — a walkthrough of the baking process.
- Royal Icing How-To — your guide to mixing, coloring, and consistency.
- Free Toolkit Download — includes the complete, printable recipe cards for both sugar cookies and royal icing (measurements + all the sweet details!).
Step 3: Simple, Happy Faces
Now for the fun part — the jack-o-lantern faces! Keep it simple with triangle eyes and noses plus a big, bold smile. These shapes are easy for little hands to fill in, especially with smaller condiment bottles that fit comfortably in their grip. (Pro tip: skip the fancy snaggle-tooth designs. I tried that once, and the frustrated frowns weren’t worth it. But I did turn the moment around by suggesting we eat the less than perfect evidence. Giggles restored instantly!)
Step 4: Add the Green Stems
Last but not least, it’s time for the little green stems. Here’s the trick: prepare tiny tipless piping bags with just a small amount of green icing. Cut them down so they fit into little hands easily, and secure the tops with clips, twist ties, or even tape to prevent leaks.
Before they pipe on the cookies, let the kids practice squeezing on small pieces of parchment paper (or even paper plates). Their determination is adorable, and their pride when they finally add the little green stem? Absolutely priceless.
These happy jack-o-lantern cookies are more than just treats — they’re memory-makers. Every triangle eye, every smile, every wobbly stem tells the story of little helpers having the best Halloween fun. And honestly, those imperfect details? They make the cookies even sweeter.
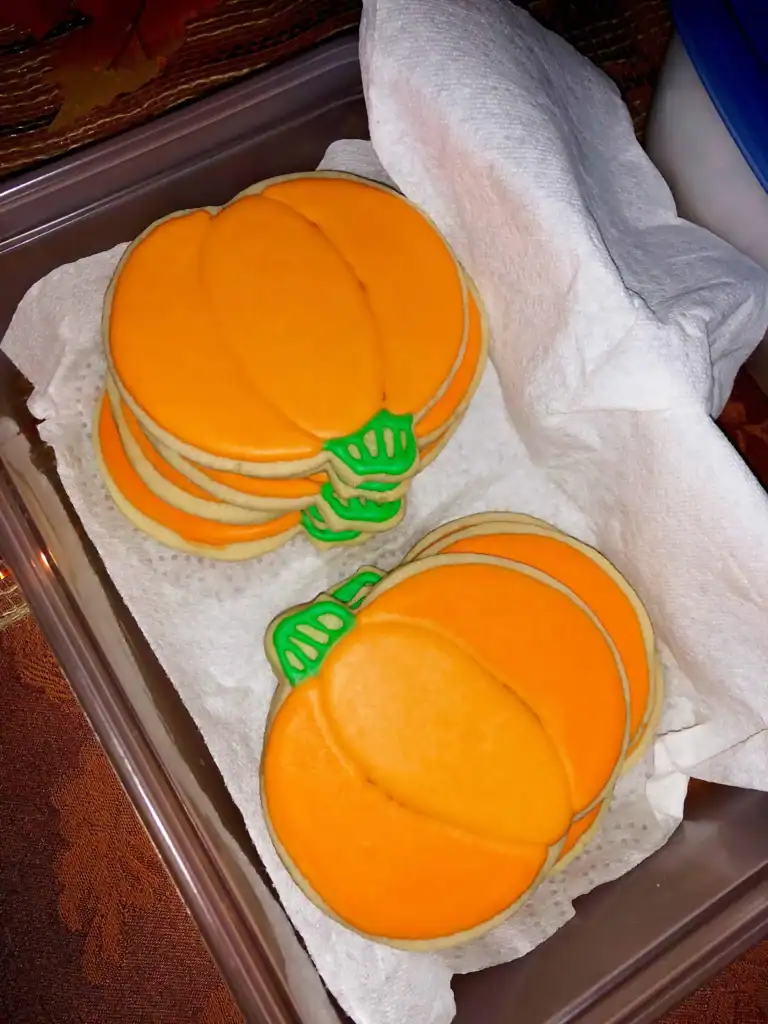
Pumpkin Patch Cookies 🎃
Sometimes bigger really is better — especially when it comes to cookies for little decorators. These large pumpkin cookies are the perfect starting point for kids because the spaces are wide, forgiving, and easy to fill. There’s nothing tiny or fiddly here, just big cheerful pumpkins that welcome wobbly lines and sticky fingers with open arms.
Step 1: Start with the Center Shape
Just like the jack-o-lanterns, you’ll want to begin by outlining and flood-filling the center oval of the pumpkin. This step gives your cookie structure and sets up the rest of the design. Because these cookies are larger, there’s more room for little hands to squeeze icing without worrying about precision. Even if the flood icing spreads unevenly, the big shape will still look like a pumpkin once it’s complete.
Step 2: Add the Side Sections
Once the middle has dried a bit, outline and fill the two side ovals. This creates the classic segmented look of a pumpkin. Tip: pipe a thicker outline to create a “wall” for kids to flood against — it makes the process feel manageable and boosts their success rate. And remember, even if a little orange icing spills over, pumpkins in real life aren’t perfectly smooth either. Imperfections just make these cookies more authentic.
Step 3: Stem It Up
Unlike the jack-o-lanterns, these pumpkins don’t need faces — their beauty is in their simplicity. A quick outline and flood of green icing at the top creates the stem. Because it’s such a small detail, it’s a great chance for kids to practice control with a mini piping bag or pre-filled squeeze tube. Keep it simple: no vines, no fancy shading. Just a stem to finish off the design.
👉 Before you dive in, gather these helpful resources:
- Sugar Cookie How-To — a walkthrough of the baking process.
- Royal Icing How-To — your guide to mixing, coloring, and consistency.
- Free Toolkit Download — includes the complete, printable recipe cards for both sugar cookies and royal icing (measurements + all the sweet details!).
Step 4: Teaching Moments
These big pumpkins are wonderful for sneaking in a little learning while decorating. Talk about how pumpkins grow in patches, why they’re different sizes, or even read a pumpkin-themed storybook while the icing dries. Decorating becomes more than an activity — it’s a whole experience.
Step 5: Mix and Match
You can make your pumpkin patch extra fun by decorating some with faces and leaving others plain. Add shading with two shades of orange if you’re feeling adventurous, or let kids stick with a single color for simplicity. Arrange them on a platter together, and suddenly you’ve got a whole pumpkin patch ready for a Halloween party, classroom event, or cozy family dessert.
Big pumpkins, big fun, and big smiles — these cookies are the ultimate “first step” project for little decorators, and they’ll make any Halloween spread feel warm, bright, and welcoming.
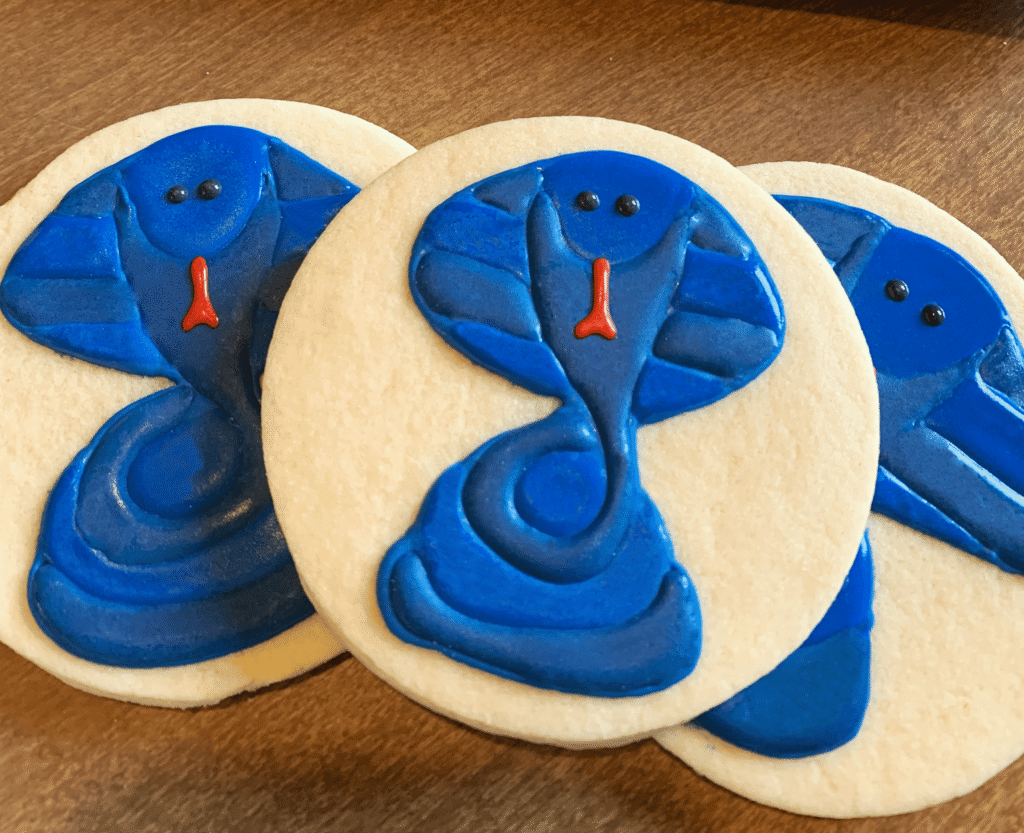
Cobra Cookies 🐍
Here’s where Halloween takes a little detour — into the land of unexpected creatures. Forget bats and pumpkins; these blue cobras slither onto the cookie tray with just enough whimsy to delight the kids and impress the adults. This design is more of an intermediate-level project, but with a little patience and planning, it comes together beautifully.
Step 1: Keep It Friendly
Cobras aren’t usually known for their warm, fuzzy personalities, but this version is a crowd-pleaser. By elongating the hood and curving the face into a subtle smile, you can transform a snake into a friendly, cartoonish character. The boys in our house were instantly hooked — something about the flicking red tongue and those dark eyes made this cookie a fast favorite.
Step 2: Embrace Negative Space
Unlike most decorated cookies that get completely covered in icing, this cobra sits on bare cookie. That choice of negative space creates the illusion of the snake slithering across sandy ground. It’s a small detail, but it makes the design feel polished and professional while saving you the extra work of covering the whole cookie.
Unlock Your 51 Page “Free” Sugar Cookie & Royal Icing Toolkit Today!

The Beautiful, printable Sugar Cookie & Royal Icing recipe cards are included inside your FREE Toolkit — Grab it for the prettiest version to save, print, or add to you binder 🍬✨
Say Goodbye to baking stress and Hello to Cookie Perfection. You’ll receive your comprehensive toolkit filled with recipes and guides to transform your Cooking-Making Experience
Your Toolkit is just a click away!
Step 3: Two Shades of Blue
The magic of this cobra comes from alternating two shades of blue icing. Instead of the traditional “rule of threes” in art, this design works in pairs of four: dark, light, dark, light. Start with the darker blue for the face and long curling body, then alternate with the lighter shade for contrast. This gives the cobra movement and definition without needing a black outline around every section.
Step 4: Section by Section
Outline and flood each color area separately, giving them time to set before moving on. This prevents colors from running together and keeps the alternating bands clean and crisp. Begin with the cobra’s head and raised body — these anchor the whole design — and then let the rest flow outward.
Step 5: Details That Matter
There’s minimal outlining here, but the details are what bring the cobra to life: the flicking red tongue and those deep black eyes. These small touches give the cobra personality and make him feel finished without overcomplicating the design.
Simplified Option
Want to make the cobra easier? Try this method: outline two basic shapes — an elongated oval for the cobra’s head and hood, and a circle for the coiled body, with the two just barely touching. Flood-fill them in one color, let them dry, and then pipe the details on top. Add curling lines to suggest the body’s slithering movement, and finish with a teardrop-shaped head outline, black eyes, and a little red tongue. This version skips the alternating flood colors but still gives you that unmistakable cobra look.
Friendly, colorful, and just a little daring — these cobra cookies prove that Halloween isn’t limited to ghosts and pumpkins. Sometimes, it’s the unexpected creatures that steal the show.
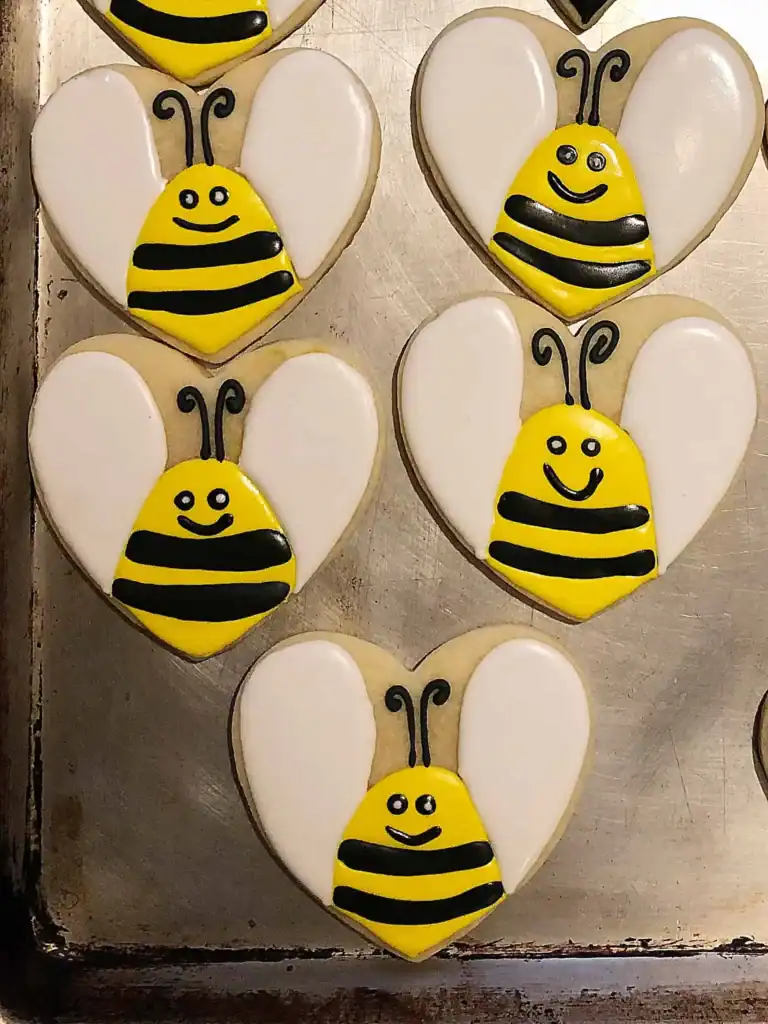
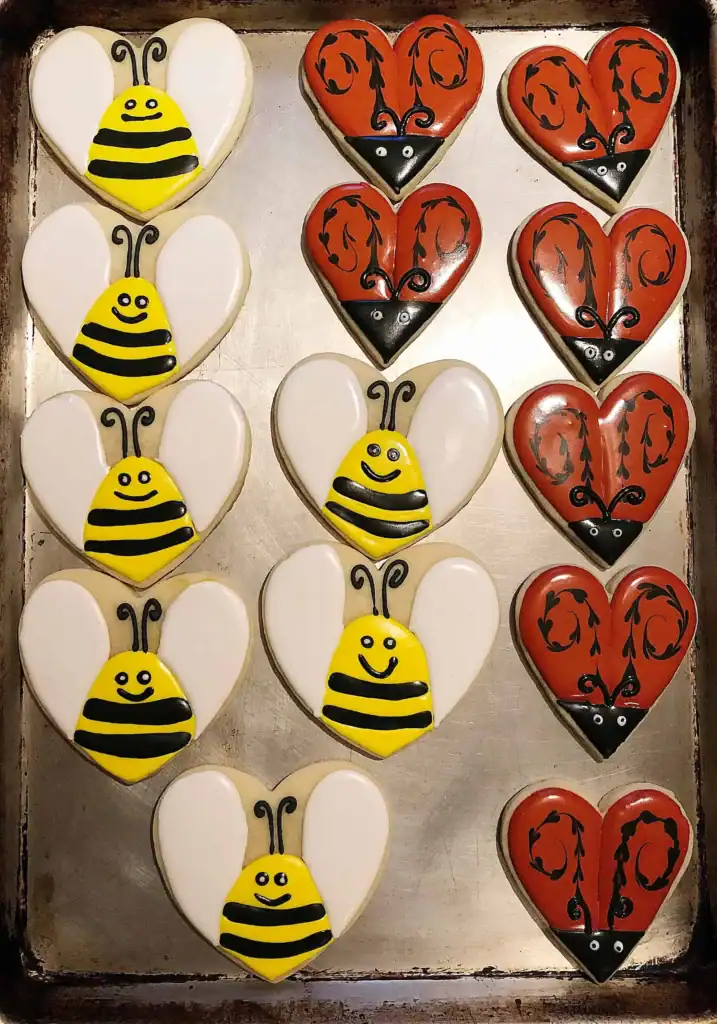
Bee-witching Bumble Bee Cookies 🐝✨
Not all Halloween cookies need fangs or cobwebs — some just need a little “buzz.” Enter the Bee-witching Bumble Bee, a sweet design built on a heart-shaped cookie. With its playful simplicity and childlike charm, this cookie is an instant favorite for little decorators. The design is so approachable — just a body, two wings, and a few fun details — that it becomes more about joy than precision.
Step 1: Build the Body
Start by outlining and flood-filling the bee’s body, which fits perfectly into the soft point at the bottom of the heart cookie. The shape almost looks like a thumbprint, making it an easy target for little hands with flood icing. Once the body is flooded, add thick black stripes while the icing is still wet. This “wet-on-wet” technique keeps the stripes smooth and seamlessly blended. (Pro tip: if you’re letting kids help, use condiment bottles instead of piping bags — less mess, more success!)
Step 2: Add the Wings
After the body has dried, outline and flood the two wings in white icing. The heart’s curved tops naturally accentuate the bee’s fluttery wings, giving it a whimsical look without needing complicated lines. These are great sections for kids to fill, since the spaces are large and forgiving.
Step 3: Faces Full of Personality
This is where the fun really begins. Pipe on eyes using black dots, then add tiny white pupils to give each bee a unique expression. Some look left, others look right, a few are cross-eyed, and a handful look perfectly normal. Mix it up for variety — the platter looks so much more fun when every bee has its own goofy personality. Add a simple curved smile to finish the face, and suddenly your bees are buzzing with charm.
Step 4: Antennae and Finishing Touches
Last but not least, add the antennae. Curl them, loop them, or let them wiggle whichever way your icing bag takes you. Antennae don’t need to be perfect — in fact, the wobblier they are, the cuter your bee will look. If you’ve got older kids helping, this is a fun detail for them to try.
These Bee-witching Bumble Bees are proof that Halloween cookies don’t need to be complicated or creepy to win hearts. With just a few steps and some silly expressions, you’ll have a tray full of buzzing little bees that kids (and adults) will adore.
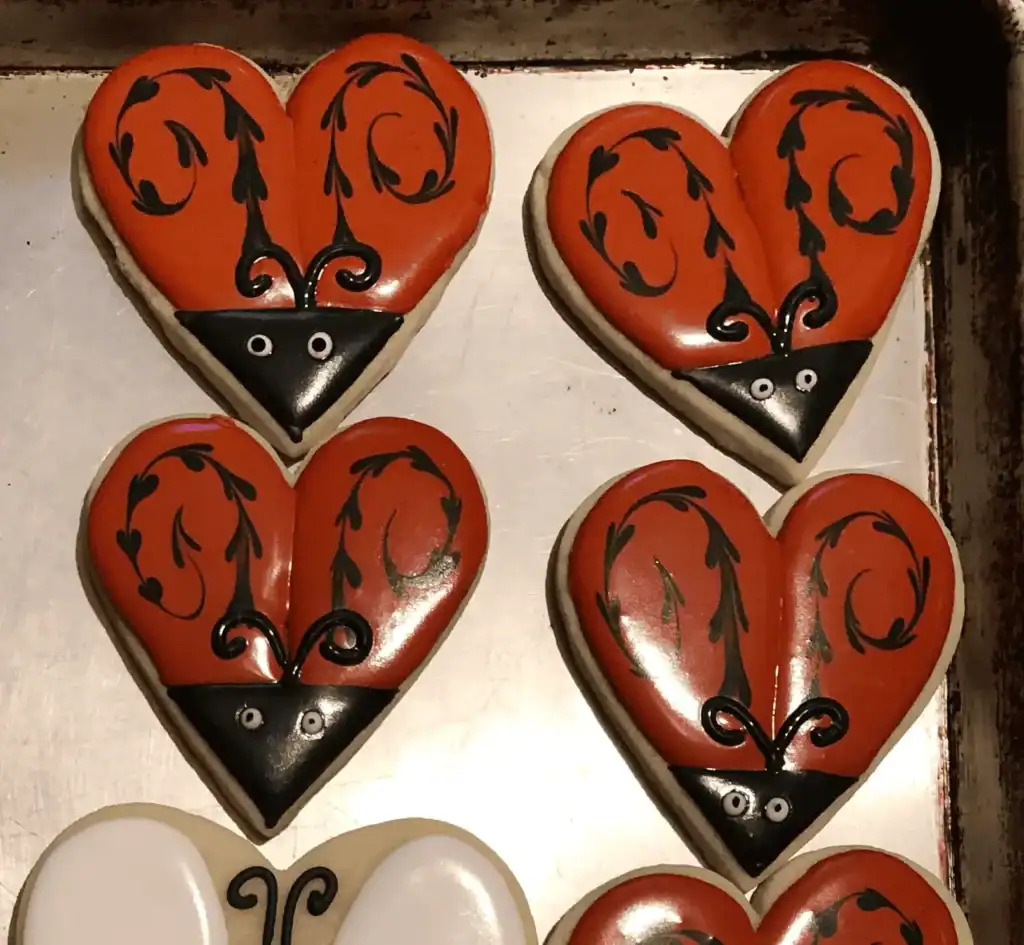
Spooky Beetle Bug Cookies 🐞✨
Our Halloween heart collection wouldn’t be complete without these pretty little ladybugs — or should we say, Spooky Beetle Bugs? They’re the perfect blend of cute and crawly, which is exactly what little decorators love. With just a triangle face and two curving wings, the design is simple enough for beginners but magical enough to feel like a big accomplishment.
Step 1: The Face
Start with the triangular black face, tucked right into the soft point of the heart cookie. This little detail anchors the design and makes the wings look like they’re ready to open. Let the icing set before moving on to avoid any accidental color blending.
Step 2: The Wings
Here’s where the fun really begins. Outline and flood each wing in red (or any color you like — ladybugs are traditional, but beetles can be as wild as your imagination). To keep the wings neat, draw an imaginary line straight up from the heart’s point to where the curves meet, dividing the cookie evenly.
👉 Before you dive in, gather these helpful resources:
Once the outline is down, it’s time for the kids to take over flood-filling those beautiful wings. And here’s the surprise twist: while the icing is still wet, add black dots in a whimsical curling path. Hand over a scribe or food-safe stylist and let them drag through the dots, pulling each one into a tiny heart shape. The look on their faces when they realize they’re “drawing with icing”? Absolutely priceless. This little trick turns simple dots into playful hearts that make the wings pop with character.
Step 3: Eyes with Personality
Finish the face with white eyes and black centers. Encourage the kids to mix it up — some big, some small, some cross-eyed, and some perfectly straight. Every bug ends up with its own quirky personality, which makes the whole tray feel alive and buzzing.
Step 4: Antennae
Last but not least, add curling antennae starting at the center line and looping outward. Antennae are one of those details where wobbly lines are a feature, not a flaw — they only add to the charm. You can keep them symmetrical, or let each one curve its own way for variety.
These Spooky Beetle Bugs are a huge hit with little girlies and buggy-loving kiddos alike. They’re easy to make, packed with personality, and a fun reminder that even Halloween cookies can be more delightful than frightful.

Monster Dino Cookies 🦖💚
Our last heart-shaped cookie is also one of the most fun — the Monster Dino. Forget realistic dinosaur silhouettes; this design embraces all the whimsy of Halloween and turns it into a toothy, grinning, kid-approved creature. With its bold teeth, silly spots, and even a cheeky little heart-shaped blood drop, this dino is more cute than creepy, and it’s guaranteed to be a hit with both the boys and the girlies.
Step 1: Build the Body
Start with the overall shape — the dino’s head follows the outline of the heart, curving from the top down to the point. The magic detail is the mouth: make the opening slightly larger than you think. Those big triangle teeth take up more room than expected, so extra space is your friend here. Outline the head and mouth in black, then flood-fill the dino in green. (Or go wild — hot pink monster dinos are on my to-do list for next time!)
Step 2: Add the Spots
Yellow spots add personality and texture. For a polished 3-D effect, wait until the green base has dried before piping them on. For an easier kid-friendly option, try wet-on-wet: add the yellow dots right after flooding the green so they sink in smoothly. Either way, they’re an adorable addition.
👉 Before you dive in, gather these helpful resources:
- Sugar Cookie How-To — a walkthrough of the baking process.
- Royal Icing How-To — your guide to mixing, coloring, and consistency.
- Free Toolkit Download — includes the complete, printable recipe cards for both sugar cookies and royal icing (measurements + all the sweet details!).
Step 3: Tooth Time
The teeth are the star of the show — big, bold triangles outlined in black for that cartoon effect. Let the outline dry a bit before flood-filling the centers with white to prevent colors from blending. Suddenly, your dino has a smile that’s equal parts fierce and friendly.
Step 4: Heart-Shaped Detail
Here’s the twist: add a tiny heart-shaped “blood drop” to one tooth. Pipe two small red dots at the tooth’s tip, then drag your scribe down through both to form a heart. It’s playful, it’s Halloween-ish, and it’s way more fun than anything gory.
Step 5: Eyes with Attitude
Every monster needs eyes! You can buy pre-made candy eyes or pipe your own for extra charm. Mix them up — one cross-eyed, one wide-eyed, one perfectly normal — so each dino has its own personality.
Monster Dino Cookies are silly, colorful, and just the right amount of over-the-top. The kids loved them (and honestly, so did the adults). They’re proof that even the simplest heart-shaped cutter can roar its way into the spotlight when Halloween rolls around.
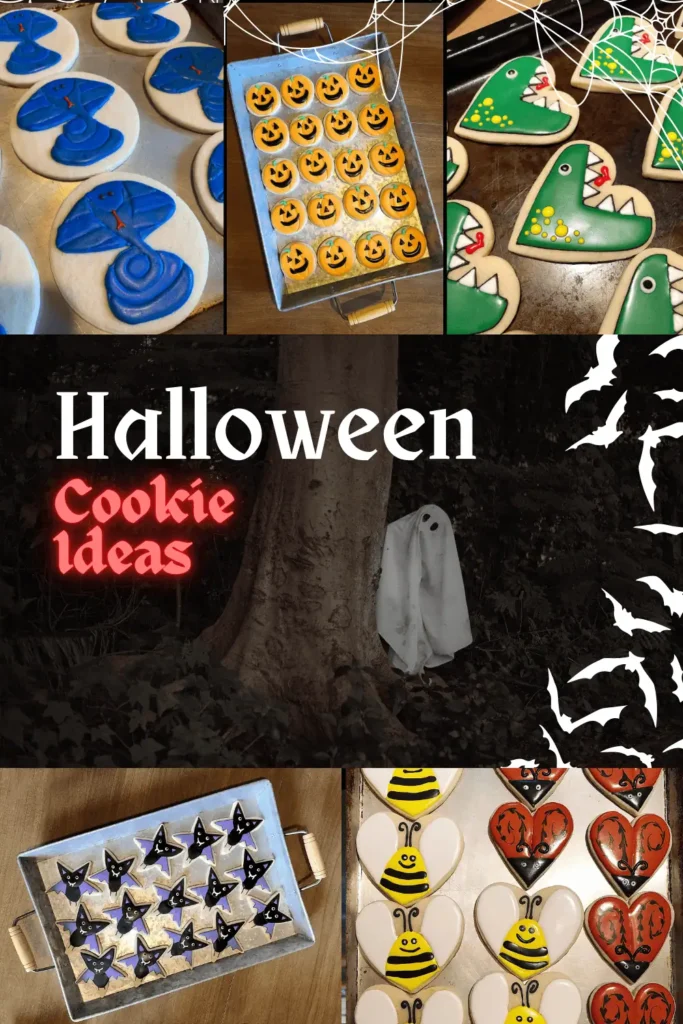
Kid-Friendly Tips for Adorable Halloween Sugar Cookies Decorating 🎨👻
Decorating cookies with little hearts is magical — but it can also get messy fast if you don’t set them up for success. These tips will help keep things fun, creative, and stress-free (for kids and grown-ups).
1. Swap piping bags for squeeze bottles.
Condiment bottles or mini squeeze bottles are easier for little hands to hold and control. They’re also less intimidating than a full piping bag.
2. Keep icing colors simple.
Two or three colors are more than enough. Kids get overwhelmed (and sticky!) with too many options. Bright orange, cheerful green, bold purple, and classic black are Halloween-perfect.
3. Prep tiny piping bags for details.
If you want kids to try stems, dots, or antennae, fill small tipless piping bags with just a spoonful or two of icing. Clip or tape the tops so nothing leaks. Small bags = big success.
👉 Before you dive in, gather these helpful resources:
- Sugar Cookie How-To — a walkthrough of the baking process.
- Royal Icing How-To — your guide to mixing, coloring, and consistency.
- Free Toolkit Download — includes the complete, printable recipe cards for both sugar cookies and royal icing (measurements + all the sweet details!).
4. Add learning moments.
Mixing food coloring is a fun way to sneak in a mini science lesson. Yellow + red = orange, yellow + blue = green and the smiles when kids discover they “made” Halloween icing are priceless.
5. Embrace imperfections.
Wobbly lines, lopsided eyes, or a few icing spills? That’s where the memories live. Those cookies are proof of little hands hard at work.
6. Try kid-friendly tools.
Food-safe scribes feel “grown-up” to kids and let them join in on fun techniques like dragging dots into hearts or swirls. Even a toothpick works in a pinch.
7. Celebrate the process.
Let the kids show off their creations, even if the cookies don’t look picture-perfect. Snap photos, giggle over the silly faces, and remember: the goal is joy, not perfection.
With the right setup, Halloween cookie decorating becomes more than just a kitchen project — it’s a memory-making tradition your little ghosts and goblins will never forget.
Wrap-Up: Sweet Success Awaits ✨
See? You don’t need fancy cutters or scary designs to whip up the cutest cookies on the block. With just a little creativity (and a few everyday shapes hiding in your kitchen drawer), you can turn stars into vampires, hearts into bugs and dinos, and rounds into the happiest pumpkins you’ve ever seen.
And here’s the best part: you can do this. 🎉 Whether you’re decorating solo, with little hearts by your side, or for a classroom party, these cookies are proof that Halloween baking can be joyful, simple, and memory-filled.
💡 Ready to take your cookies to the next level? Grab your Sugar Cookie & Royal Icing Toolkit](link to your toolkit) — it’s packed with everything you need for smooth icing, perfect dough, and decorating success.
👉 Before you dive in, gather these helpful resources:
- Sugar Cookie How-To — a walkthrough of the baking process.
- Royal Icing How-To — your guide to mixing, coloring, and consistency.
- Free Toolkit Download — includes the complete, printable recipe cards for both sugar cookies and royal icing (measurements + all the sweet details!).
So go ahead — pick up that piping bag (or squeeze bottle!), sprinkle a little imagination, and watch your kitchen turn into the sweetest haunted bakery on the block. You’ve got this, and your cookies are going to sparkle. 🌟
Pin & Share!!!